Breadcrumb
How to add a new class section?
1. Add the new section of a class.
- If other section of this class already exists, follow this path:
NAVIGATION: Main Menu > Curriculum Management > Schedule of Classes > Maintain Schedule of Classes
- If no other section of this class exists, follow this path to add the very first section of a class:
NAVIGATION: Main Menu > Curriculum Management > Schedule of Classes > Schedule New Course
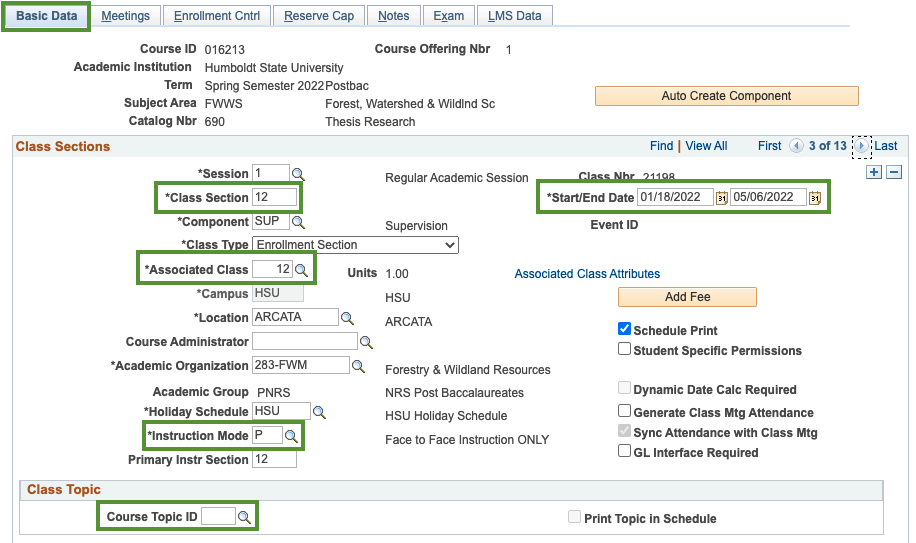
When you find the class you wish to add, on the Basic Data tab, enter the new Class Section number as well as its corresponding Associated Class number (the Associated Class number is what drives class unit values and grading modes).
- For single component classes, use consecutive numbers starting at 1.
- For multiple component classes, use numbers 10, 20, 30, etc. for the Class Section number of the main class component (usually lecture) and numbers 11, 12, 13, 21, 22, 23, etc. for secondary components (such as labs). If there are tertiary class components (such as discussion), use 15,16,17, 25, 26, 27, etc. for their Class Section numbers. Additionally, enter Associated Class number 1 for sections 10, 11, 12, 13, 15, 16, 17, etc., number 2 for sections 20, 21, 22, 23, 25, 26, 27, etc., and so on.
Class dates will default to the semester start/end dates. If necessary, adjust the Start/End Date of the class.
Instruction Mode will default to "P" which stands for "Face to Face Instruction ONLY". If you are scheduling a Hybrid ("H") or fully Online ("O") class, select the corresponding Instruction Mode.
If the class has special topics, select the appropriate topic using the magnifying glass lookup icon next to the Course Topic ID field.
NOTE: Notice that upon saving this page, some classes may show to have a range of units - we will adjust that on the Adjust Class Association page (read below).
On the Meetings tab, first enter class meeting days (Pat field) and times (Mtg Start and Mtg End fields). If the class is placed in a classroom that you control, feel free to enter the appropriate room code in the Facility ID field. You may also enter OC (for off-campus classes), TBA (for classes that will not meet in a classroom), or ONL (for classes that are taught online). Otherwise, leave the Facility ID field blank.
Add the instructor to the class (by entering their ID number or by using the lookup function) and set their Access to grade to the "Approve" value.
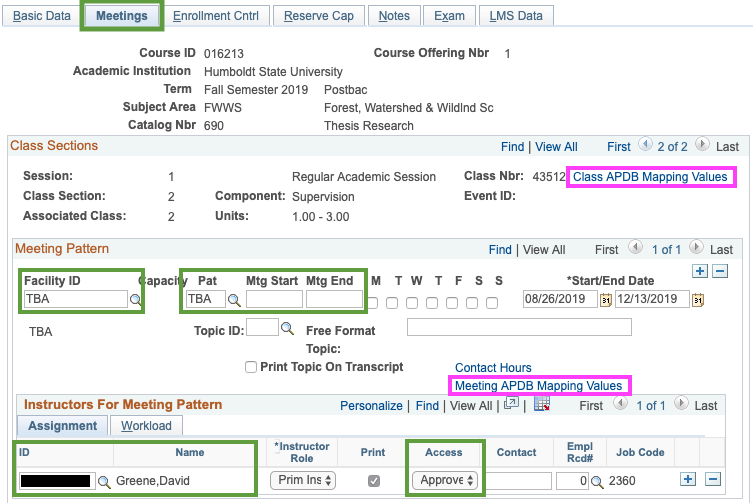
Now, you should visit the Class APDB Mapping Values and the Meeting APDB Mapping Values subpages.
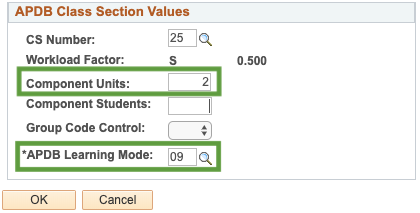
Under the Class APDB Mapping Values link, in the Component Units field, enter the number of units the class (or its component) is worth.
If the class is taught as a hybrid or entirely online, you will also need to adjust the APDB Learning Mode accordingly (use the lookup icon to view available options).
Click on the OK button when you are finished.
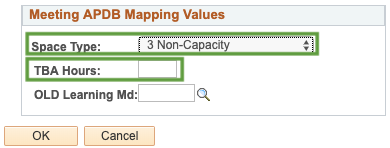
Under the Meeting APDB Mapping Values link, select the appropriate Space Type. Do not use "0" value or leave this field empty.
For classes with Course Classification Numbers C1-C21 that do not have specified meetings days and times, enter the appropriate number of TBA Hours. This number can be calculated using this guide.
Click on the OK button when you are finished.
On the Enrollment Cntrl tab,
- enter the size of the classrooms this class will need in the Requested Room Capacity field. For TBA/ONL/OC classes you can leave this value as "1",
- enter the planned Enrollment Capacity (number of students to be enrolled) for this class,
- enter "99" in the Wait List Capacity field,
- double-check that the Add Consent is set appropriately to Instructor Consent Required or No Special Consent Required.
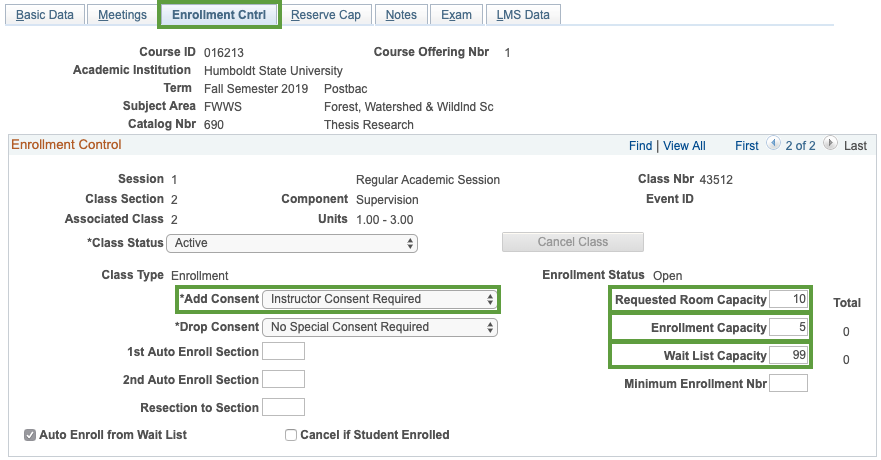
Then Save the page using the button at the bottom of the page.
2. Adjust units and grade modes (if needed).
NAVIGATION: Main Menu > Curriculum Management > Schedule of Classes > Adjust Class Associations
NOTE: This page can be edited ONLY prior to the beginning of registration for a given semester. After that, changes must be made by the Academic Scheduler.
All classes must be offered for a specific number of units (not a range of units). In order to "lock" the number of units for a section to a particular number, on the Class Associations tab, make sure that all four of the following fields have the same unit value: Minimum Units, Maximum Units, Academic Progress Units, and FA Units. Do not set this number to a value outside of the class' unit value range.
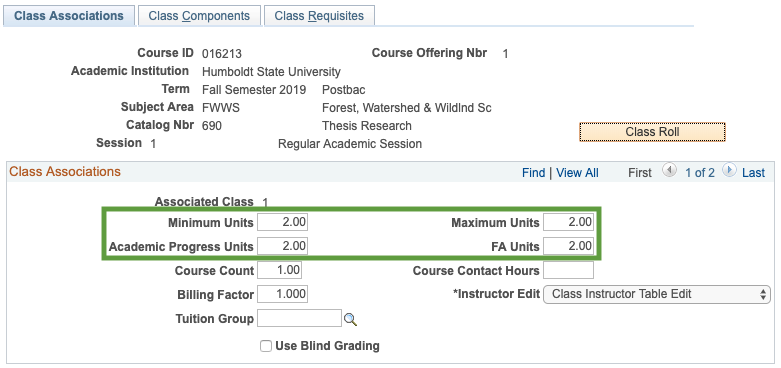
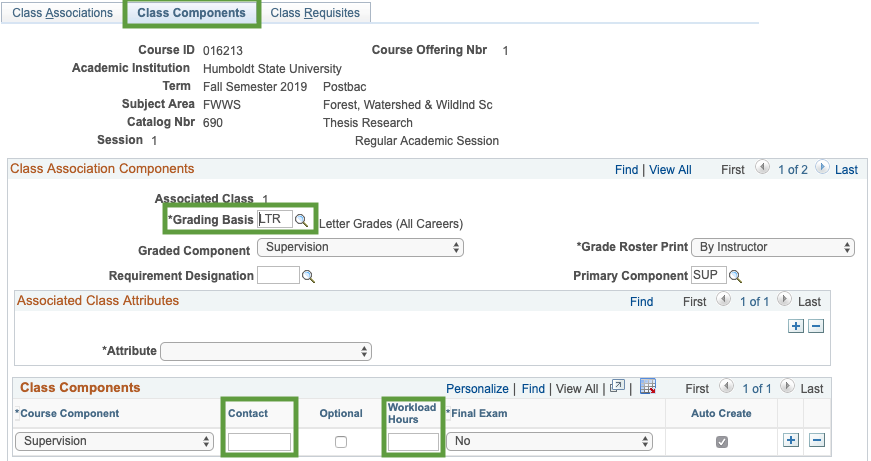
On the Class Components tab, if appropriate, adjust the class Grading Basis. You can read more about grading modes here.
For variable unit classes with Course Classification Numbers C1-C21, you will also need to adjust the number of instructor's Contact hours and Workload Hours. These numbers can be calculated using this guide.
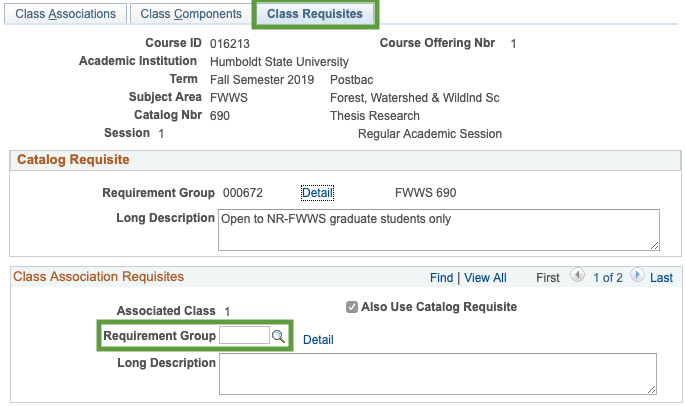
Lastly, on the Class Requisites tab, you may see catalog level requisites attached to this class in the Catalog Requisite section of the page.
If appropriate, in the Class Association Requisites section of the page, you may enter or select the Requirement Group number to add any class-specific requisites. Work with the Office of the Registrar to make arrangements for class-specific requisites.
3. Generate permission numbers.
Finally, if you are adding this class after Registrar's Office created permission numbers for all existing sections, you will need to generate permission numbers for this newly added class section. Follow instructions in this guide to do that.


