


Breadcrumb
Introduction to the Rich Content Editor
Introduction
Canvas has a simple, yet powerful, content editor that is used for creating new content.
Tutorial
103 - Rich Content Editor (RCE) (All Users) from the Instructure Canvas Community
The Rich Content Editor is used in features such as: Announcements, Assignments, Discussions, Pages, Quizzes, and Syllabus.
Although clean and streamlined, the Rich Content Editor is sophisticated enough to support embedding video content, math formulas, and other rich media.
Accessibility
The rich content editor in Canvas is one tool that you should become very familiar with. These icons above the pages where you add text, allow you to add headings to your page (much like you do in Word), add images, add tables, videos, lists, etc.

Page Structure
Headings
Just as you do in Word, you add structure to a Canvas page by using headings. The page title is Heading 1, so any section heading in Canvas will begin with Heading 2. To add headings, you simply highlight the line of text, then select the appropriate heading from the blocks drop-down menu (which will currently be set to Paragraph).
You can check how text has been formatted by highlighting or clicking on a section of text (while in edit mode). At the bottom of the editing pane, you will see a p, h2, or h4 appear. These stand for paragraph (normal text, such as this text), heading 2 (section titles), heading 3 (sub-section), or heading 4 (sub-sub section).
Lists
When you want to add a list of items to your text in Canvas, enter each item in the list on a separate line. Then, select the items, and click on the Ordered and Unordered Lists icon in the Rich Content Editor toolbar and choose one of the available options, such as numbered, bulleted, alphabetic, etc. Note that bulleted is the default.
Alt Text for Images
Canvas makes it easy to add alt text - prompting you to add it when you first upload your image (if you're using the rich content editor).
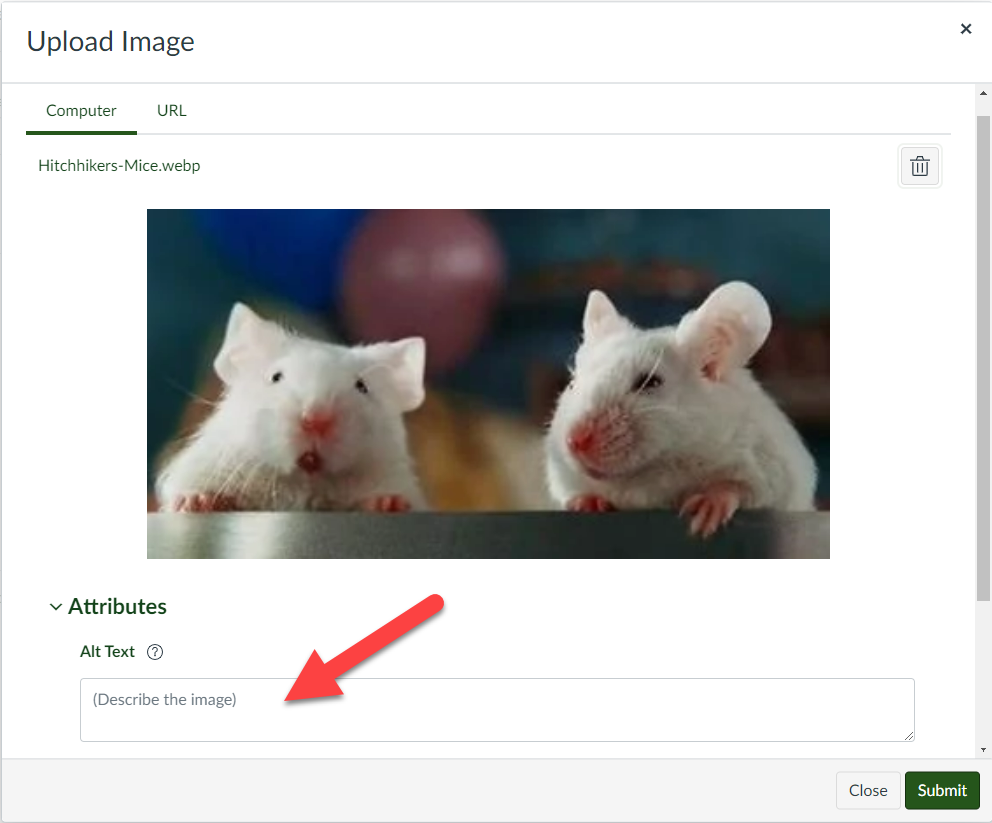
If you're adding alt text to existing images, click on the image, then click on Image Options. The Image Options pop-out menu will appear. Enter your image description into the Alt Text field, and then click on the Done button. If the image is decorative, such as with a banner, remove all content from the alt text field, and select the Decorative Image checkbox, instead.
Descriptive Links
Use descriptive links: Links, or urls, should tell the user exactly where they’ll go if they click on them. They should make sense when taken out of context of the surrounding text. If link text is not descriptive, it will be unclear or difficult to read where the links lead. Here are some examples of descriptive and non-descriptive links:
DO THIS:
- Get citation help from the Cal Poly Humboldt Research Guides
- Visit the Learning Center for tutoring and writing help
DO NOT DO THIS:
- Ambiguous Link Description: Read More or Click Here
- Long URL: https://libguides.humboldt.edu/cite
Here are some guides that explain how to add links using the Rich Content Editor in Canvas:
- How do I create hyperlinks to external URLs in the Rich Content Editor as an instructor?
- How do I create hyperlinks to course, group, and user files in the Rich Content Editor as an instructor?
Tables
Canvas allows you to edit tables in such a way that you can use the rich content editor to add headings to them (as opposed to going into the HTML to do it!). Tables should have captions and headings to assist screen readers in reading the data correctly. Tables should not be used to format/control the layout of your page.
Once you've made your table, do the following to make it accessible:
- Click on the table to select it. Then, click on the table icon in the rich content editor.
- Select Table properties. In the Table Properties pop-up window, check "Show caption," and then click Save.
- Click at the top of your table to type a caption for the table.
- Highlight the cells of the header row (or column).
- Click on the table icon in the rich content editor, again, and select Row > Row Properties.
- In the Row Properties pop-up window, select "Header" from the Row type dropdown menu. Click Save.
Review the Canvas Guide for step by step instructions on making tables in Canvas.
Captions/Transcripts for Media
Another fun function in Canvas is the ability to easily add in audio and video recordings to each page using the rich content editor. However, if you have a student who is deaf, hard of hearing, or simply doing classwork in a noisy environment, you'll want to make sure you also provide captions or a transcript.
I've learned over the years that my recordings are smoother, clearer, and stick to the point when I use a script. And what's even better — that script can now be used to create captions (for a video) or a transcript (for audio).
At Cal Poly Humboldt, we encourage faculty and lecturers to use our video hosting service, Panopto. Every video uploaded to Panopto (whether it was created with Panopto or not) is machine-transcribed using Automatic Speech Recognition (ASR) technology. This provides the backbone for their video search technology, which means you can search inside the spoken content of every video you upload into Panopto. Machine-generated captions can be generated in a quarter of the time it takes to play an individual video.
You can use Panopto directly in Canvas via the Panopto Video menu or anywhere you have access to the rich content editor OR you can use Panopto via the Cal Poly Humboldt Panopto Dashboard. In order to access the Dashboard, you will need to login with the Humboldt SSO, using your campus username and password.
More Info
Need more information? Check out these Canvas Guides!